Integrations: Argos
Last Updated - Mar 10, 2015Home | Links to your Reports | Links to Data Cookbook | Pop-up/Frame | Argos
This page will show you how to create a standard set of links to the Data Cookbook, a pop-up window and a frame.Argos Links to Data Cookbook
For all Argos Data Blocks, you can create a panel of Data Cookbook specific links that you save in your library. This panel can then be easily added to the header or footer of any main form.

Each link, when clicked, will open a tab in the users browser. For the PC client, this means it will switch to the users browser, then open the new tab. For the web viewer, it will simply open a new tab next to the current one. This set of links utilizes a parameter called :cookbook_id which is expected to be set in your data block design. Instructions for setting this up, and then using it on each report follow. Here is a description of each link:
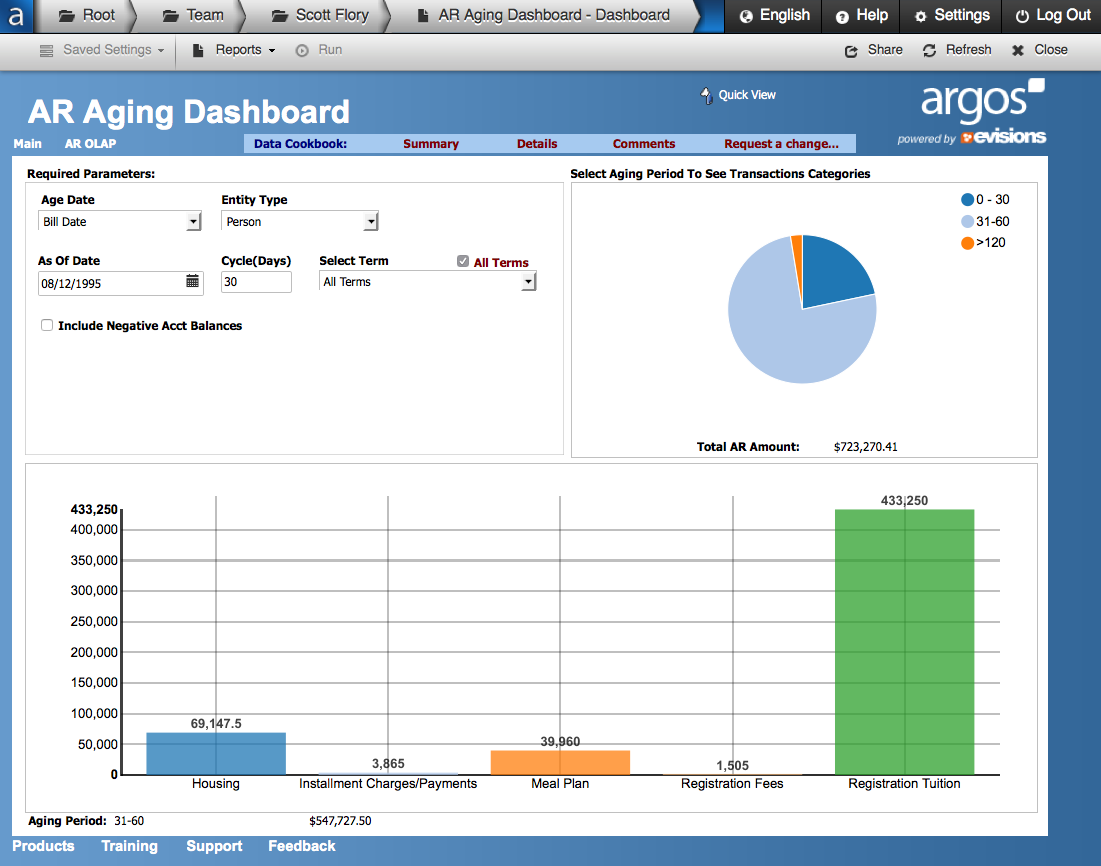
- Summary Opens the summary viewer, this is an HTML page you can host locally that requires additional setup but provides a brief summary of the specification
- Details Opens the specification in the Data Cookbook and brings the user to the Overview tab
- Comments Opens the specification in the Data Cookbook and brings the user to the bottom of the page where the comment thread is shown
- Request a change... Attempts to request a change for this specification in the Data Cookbook, and if successful, will show them the form for requesting a change. It will inform the user if it cannot make the request (if the specification is already under work or if the user does not have permissions to request a specification).
How to create the object for your library
Step 1: Create a Panel
Create a panel on any data block main form. This should be just tall enough for the labels and wide enough for as many links as we are putting on the bar. Click on the "panel" icon in the data block designer and then click on your main form where you want the panel to be initially placed. You can then drag the edges to re-size as needed.Step 2: Create Labels for each link
For each link, you need to create a label and provide an "on-click" action for it. Click on the "label" icon in the data block designer and then click on your main form inside the panel you just created. Then you can edit the properties of the label to set the title and the on-click event. Here are the label titles and on-click events you will want to use:| Label Title | On-click Hyperlink value to add |
|---|---|
| Summary * | http://YOURSERVER/PATH/dcb_spec_summary.html?report_id=%%:cookbook_id%% |
| Details | https://myschool.datacookbook.com/institution/reports/%%:cookbook_id%% |
| Comments | https://myschool.datacookbook.com/institution/reports/%%:cookbook_id%%#new_comment |
| Request a change... | https://myschool.datacookbook.com/institution/reports/%%:cookbook_id%%/changes/new |
* Note: If you want the summary link, then you must setup the summary viewer
Step 3: Create a Parameter
You will need a parameter to store the ID of the specification. This will be done on each data block as it is created. Click on parameters and then the plus sign to create one. Choose a manual parameter. Give it the name of cookbook_id, leave the type as text, and provide an initial value of a valid, approved specification ID. To get a specification ID, use the Data Cookbook and browse to any approved specification. When viewing the specification, you will see in the specification ID at the end of the URL, just after ...datacookbook.com/institutions/reports/9999. That 9999 is the value to use.Step 4: Test the links!
If you have completed the steps above, you have one data block main form with a set of Data Cookbook links. Test it in both PC client and Web viewer to see how they work.Step 5: Save it in your library
Adjust the set of links to your liking and then save it in your library. Give them a name like "Data Cookbook Links". Since these links use the parameter cookbook_id, they will not need changing when placed on any main form... the main form will simply need to set a single parameter for all links to work (more on that in the next section).Congratulations! You have just set up an easy way to link all of your data block main forms to the Data Cookbook
How to add it to any data block
Step 1: Create a Parameter
Open your data block in the designer. You will need to create a parameter to store the ID of the specification. This is only done once for each data block, the specification ID does not change in the Data Cookbook.Click on parameters and then the plus sign to create one. Choose a manual parameter. Give it the name of cookbook_id, leave the type as text, and provide an initial value of a valid, approved specification ID. To get a specification ID, use the Data Cookbook and browse to any approved specification. When viewing the specification, you will see in the specification ID at the end of the URL, just after ...datacookbook.com/institutions/reports/9999. That 9999 is the value to use.
Step 2: Add the links from your library
Open your library and find the "Data Cookbook Links" object you created before. Add it to your form and adjust its placement. Thats it.Step 4: Test the links!
Test it in both PC client and Web viewer to confirm they work.Congratulations! You have just set up another data block
Argos Popup Summary Viewer
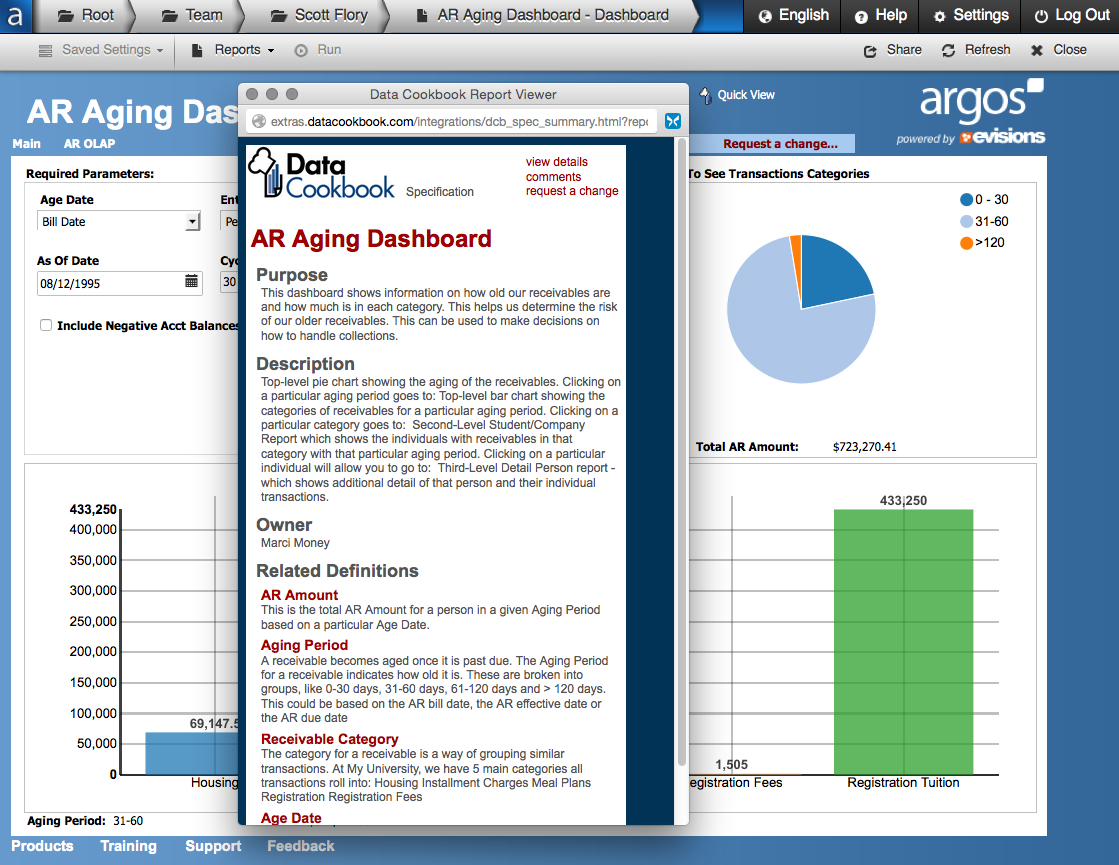
Note: This pop-up viewer will only work in the web viewer. If you follow these instructions, it will be invisible on the PC client and will function in the web viewer.
How to do it
Step 1: Creating a label
We need to create a label that has HTML in the text. We do this because in the web viewer, any HTML in the text area will get rendered. This is also why it does not work in the PC client, since that is not a browser and it cannot render HTML.Create a label and place it on your form. In the text of the label place the following HTML (replacing the bold parts with your specifics:
<!-- Requires Web Viewer --><a style="text-decoration:none; color: white;" href="http://YOURSERVER/PATH/dcb_spec_summary.html?report_id=9999" onclick="javascript:void window.open('http://YOURSERVER/PATH/dcb_spec_summary.html?report_id=9999','datacookbook', 'scrollbars=yes,center,height=625,width=410'); return false;"><img src="https://community.datacookbook.com/favicon.ico" /> Quick View</a>
Step 2: Change the label text color
In the PC client, this will show as raw text, which will not be pretty. So, we will hide the label by setting the text color of the label to the same color as the background of your form where you placed the label.Step 3: Test the link in Web Viewer
Test the link in the web viewer. You may need to adjust the height/width embedded in the HTML to suit, but it should work fine. Test the link in the PC client, it should be invisible.Step 4: Repeating for other Data Blocks
You can save this as an object in the library, but time you place this on a form, you will have to edit the HTML in the text to change the specification ID (since it is different for each spec and this HTML cannot use a parameter).Argos Frame Summary Viewer
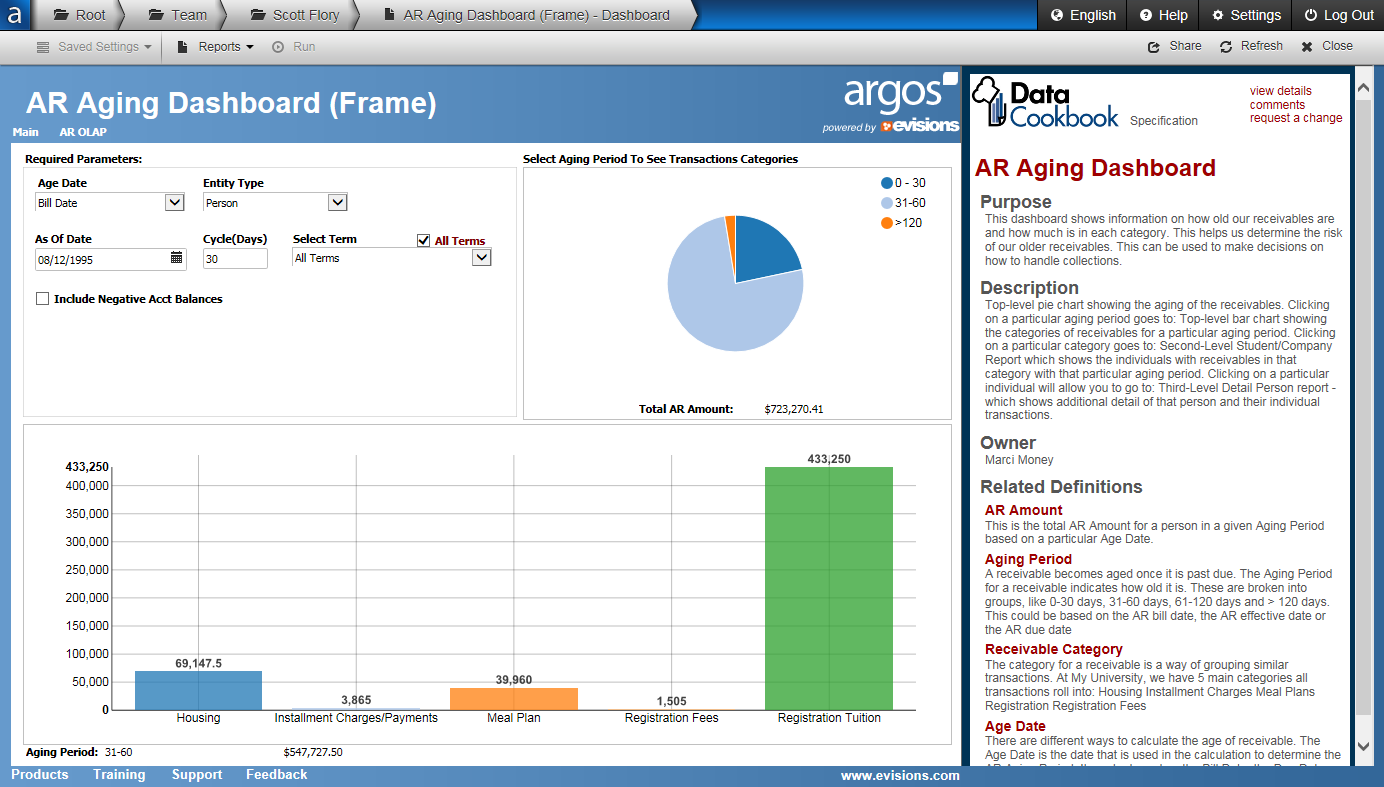
Note: This pop-up viewer will only work in the web viewer. If you follow these instructions, it will be invisible on the PC client and will function in the web viewer.
How to do it
Step 1: Creating a label
We need to create a label that has HTML in the text. We do this because in the web viewer, any HTML in the text area will get rendered. This is also why it does not work in the PC client, since that is not a browser and it cannot render HTML.Create a label and place it on your form. Generally, this should match the size of the summary viewer itself (about 410 wide by 600 tall). In the text of the label place the following HTML (replacing the bold parts with your specifics:
<iframe src="http://YOURSERVER/PATH/dcb_spec_summary.html?report_id=9999" width="410" height="702" scrolling="auto"></iframe>